Official Luthiers Forum!

Owned and operated by Lance Kragenbrink
It is currently Sun Jul 06, 2025 5:02 am


All times are UTC - 5 hours


Post new topic Reply to topic  [ 29 posts ]  Go to page 1, 2  Next
Author Message
 Post subject:
PostPosted: Wed Oct 04, 2006 8:38 am 
Offline
Cocobolo
Cocobolo

Joined: Tue Jan 03, 2006 4:17 am
Posts: 338
Location: United States
I know a bunch of you love the sat-t-plane, as do I , but I can't really get it sharp. Or maybe set-up, not sure which, but it does leave more marks then i think it should. Anyone have any great tips to get the most out of it..
TIA
Mike


Top
 Profile  
 
 Post subject:
PostPosted: Wed Oct 04, 2006 9:48 am 
Offline
Koa
Koa
User avatar

Joined: Sat Jun 24, 2006 12:41 pm
Posts: 975
Location: United States
First name: Tracy
Last Name: Leveque
City: Denver
State: CO
Country: USA
Focus: Build
Status: Amateur
I'd love to hear this too. I got so frustrated with sharpening, that I just went down to woodcraft and bought another one! Works great now
Tracy

_________________
Tracy
http://www.luthiersuppliers.com


Top
 Profile  
 
 Post subject:
PostPosted: Wed Oct 04, 2006 10:06 am 
Offline
Koa
Koa
User avatar

Joined: Thu Feb 24, 2005 4:53 am
Posts: 1584
Location: PA, United States
Yep, I'm just buying new ones too. @ ABOUT $24, my time is worth too much not to! Can't wait.

Hey Tracy, why don't you post your nifty anti-rollback, anti-kickback hold down thingies that you use with your Wagner?


Top
 Profile  
 
 Post subject:
PostPosted: Wed Oct 04, 2006 10:10 am 
Offline
Cocobolo
Cocobolo

Joined: Mon Jan 03, 2005 6:59 am
Posts: 159
Location: Canada
Last time I sharpened my Saf-T-Planer, I made a small jig to hold the bits. Using my drill press I ground(with provided stone)them until they were semi sharp. I then honed them with 15u (800 grit) sandpaper from Lee Valley. Then 5u (1200) paper, 0.5u (2000) paper. I used a drill bit as my dowel and wrapped the paper around it and honed away. I don't believe you are to sharpen the outside of the cutter. They feel sharp to the touch, but probably not as a chisel. Don't forget to check your drill press for being true. This could cause you to get lines(marks)in your wood.
I used mine on my neck blanks a couple days ago and decided to hone the cutters with the paper once more. I will let you know how it cuts later today.


Top
 Profile  
 
 Post subject:
PostPosted: Wed Oct 04, 2006 10:31 am 
Offline
Koa
Koa
User avatar

Joined: Sat Jun 24, 2006 12:41 pm
Posts: 975
Location: United States
First name: Tracy
Last Name: Leveque
City: Denver
State: CO
Country: USA
Focus: Build
Status: Amateur
Terry,
Here you go...

Tracy

_________________
Tracy
http://www.luthiersuppliers.com


Top
 Profile  
 
 Post subject:
PostPosted: Wed Oct 04, 2006 11:11 am 
Offline
Cocobolo
Cocobolo

Joined: Tue Jan 03, 2006 4:17 am
Posts: 338
Location: United States
Ron, although I don't understand the reasoning, i thought the sharpening instructions that come with the planer specifically says to NOT hone them.. Maybe they just it to seem easier then it really is.

Tracy, are those whelliething a majigs spring loaded or just weighty. Where did you get them? I thought I remember someone using a rollerblade roller also. I just hold down with my hand, maybe thats not consistent enough.

Also, the wheel that came with the planer, are they all way out of round or just mine. How can I fix that? New one??

Hesh, i have a piece of 3/16 rod bent with two opposing 70 degree (about) angles and one end filed to a point. I just chuck it, then swing it around and adjust until it has a consistent gap to the table. Problem is I have a radial press and every time I loosen it to move the head I have to readjust. The detent for 90 degrees is sloppy, plus or minus about 2 degrees.
Mikemikev38994.847662037


Top
 Profile  
 
 Post subject:
PostPosted: Wed Oct 04, 2006 11:32 am 
Offline
Cocobolo
Cocobolo

Joined: Tue Jan 03, 2006 4:17 am
Posts: 338
Location: United States
Hesh, the slop I am talking about is only important during the set up, because once you feel the head is at the correct angle you tighten down on its clamp and it stays put. Its only with the clamp open when it flops around.
But you did just make me think about it, I believe I may have slop in the "quill", is that the right term, when it is extended. I'll have to check that. When I adjust the cutting hight I move the head down, and maybe this causes slop, maybe I should raise the table instead.

I thought the radial press was a good idea, but honestly it isn't as tight as I would like it to be..


Top
 Profile  
 
 Post subject:
PostPosted: Wed Oct 04, 2006 1:11 pm 
Offline
Brazilian Rosewood
Brazilian Rosewood
User avatar

Joined: Wed Jun 22, 2005 10:11 am
Posts: 2761
Location: Tampa Bay
First name: Dave
Last Name: Anderson
City: Clearwater
State: Florida
Zip/Postal Code: 33755
Country: United States
Mike, Yes Raising the table is how I do it and It works fine. And I have a little bearing that is a hold down.Definatly a cool tool. I sharpen mine with the stone thats included and it's well rounded and works fine.I don't know why yours is out of round,maybe you can order a new stone .Maybe Al Carruth will chime in,He has a ton of experiance with the Wagner.

_________________
Anderson Guitars
Clearwater,Fl. 33755


Top
 Profile  
 
 Post subject:
PostPosted: Wed Oct 04, 2006 1:29 pm 
Offline
Cocobolo
Cocobolo

Joined: Tue Jan 03, 2006 4:17 am
Posts: 338
Location: United States
thanks Dave, by out of round, i an talking about the cicumference not being centered on the shaft,, the edge is round. As you try to sharpen it the stone has a high spot. must be a way to smooth that out, or as you say,, just get a new one..always been that way..


Top
 Profile  
 
 Post subject:
PostPosted: Wed Oct 04, 2006 2:29 pm 
Offline
Koa
Koa
User avatar

Joined: Tue Mar 14, 2006 4:08 pm
Posts: 1018
Location: Denver, Colorado
I've sharpened the blades several times with success. I chuck the
grinding wheel up in the drill press and go for it. Sometimes they fly out
of my hand and scare me a bit, but that adds to the excitement! Like the
instructions say, grind until you get the tiny burr all the way accross, and
grind deep into the groove.

I'd use a dressing stone to get the high spot out.

Mike

_________________
Mike

"The Dude abides. I don't know about you but I take comfort in that. It's good knowin' he's out there. The Dude. Takin' 'er easy for all us sinners. Shoosh." The Stranger


Top
 Profile  
 
 Post subject:
PostPosted: Wed Oct 04, 2006 3:05 pm 
Offline
Brazilian Rosewood
Brazilian Rosewood

Joined: Tue Feb 15, 2005 10:31 am
Posts: 3134
Location: United States
[QUOTE=verhoevenc] it
says to run it at 4000-6000 RPM or somehting[/QUOTE]
Hmmm. I don't remember seeing any standard drill press, even the larger ones, rated to run more than about 3500 rpm.


Top
 Profile  
 
 Post subject:
PostPosted: Wed Oct 04, 2006 3:33 pm 
Offline
Koa
Koa

Joined: Thu Apr 07, 2005 2:38 pm
Posts: 632
Location: United States
First name: R
Last Name: Coates
City: Selma
State: CA
Focus: Build
[QUOTE=CarltonM] [QUOTE=verhoevenc] it
says to run it at 4000-6000 RPM or somehting[/QUOTE]
Hmmm. I don't remember seeing any standard drill press, even the larger ones, rated to run more than about 3500 rpm. [/QUOTE]

Put it in your router....


JUST A JOKE!!!! PLease don't try this at home!


Top
 Profile  
 
 Post subject:
PostPosted: Wed Oct 04, 2006 3:38 pm 
Offline
Koa
Koa
User avatar

Joined: Tue Mar 14, 2006 4:08 pm
Posts: 1018
Location: Denver, Colorado
I don't think slower speeds would be a problem at all, in fact I'm sure i've
always cranked it down to the lowest speed possible.

I just hold with my hands too; no jig or fence or anything.

Mike

_________________
Mike

"The Dude abides. I don't know about you but I take comfort in that. It's good knowin' he's out there. The Dude. Takin' 'er easy for all us sinners. Shoosh." The Stranger


Top
 Profile  
 
 Post subject:
PostPosted: Wed Oct 04, 2006 3:45 pm 
Offline
Cocobolo
Cocobolo

Joined: Tue Jan 03, 2006 4:17 am
Posts: 338
Location: United States
3470 rpm,,, its better with the high rpms because the chips fly around the room further. 
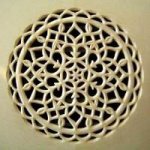
Seriously I think you just have to adjust the feed rate down a bit with the slow rpms.


Top
 Profile  
 
 Post subject:
PostPosted: Wed Oct 04, 2006 8:42 pm 
Offline
Brazilian Rosewood
Brazilian Rosewood
User avatar

Joined: Thu Jan 06, 2005 7:29 am
Posts: 3840
Location: England
OK, here's how I sharpen my WSP. I do it just as SM say in their instructions! Mount the stone in the drill press, put the cutter in a press vice with a bar through the hole and with the press off, level the cutter in the vice as shown in the photo, so that the stone runs in evenly to the end of the recess. Remove the vice then run the press up to speed (fast as it will go) then feed the cutter in and grind all the way in until a small burr appears along the whole edge of the cutter. Take it out of the vice and just dress the back edge of the cutter with a stone to remove the burr. Screw back into the planer. Repeat twice more! I sharpen after every major job.


The others are right when saying that the key to success with the planer (apart from keeping it sharp) is to have the table level this is how I do it with a bent piece of 4mm covered steel bent to shape. Rotate the chuck by hand and level the table, either with the adjusters or shims between the wooden and iron tables.


I use the planer for all the thinning of my backs and sides, and wouldn't go back to a thickness sander. I still prefer a plane for my tops.

By the way my drill press has 16 gears and runs up to 4200 rpm.


ColinColin S38995.3862962963

_________________
I don't believe in anything, I simply make use of a set of reasonable working hypotheses.


Top
 Profile  
 
 Post subject:
PostPosted: Wed Oct 04, 2006 11:03 pm 
Offline
Contributing Member
Contributing Member
User avatar

Joined: Thu Dec 01, 2005 11:38 am
Posts: 639
Location: United States
Colin's photo shows the bent wire( boy that's really big "wire") method to check level table. As I recall, Al Carruth swears by the Wagner and has posted great use and sharpening information. Maybe someone should ping him(One ping only;one ping)MT


Top
 Profile  
 
 Post subject:
PostPosted: Thu Oct 05, 2006 2:54 am 
Offline
Koa
Koa
User avatar

Joined: Sat Jun 24, 2006 12:41 pm
Posts: 975
Location: United States
First name: Tracy
Last Name: Leveque
City: Denver
State: CO
Country: USA
Focus: Build
Status: Amateur
[QUOTE=mikev] Tracy, are those whelliething a majigs spring loaded or just weighty. Where did you get them? I thought I remember someone using a rollerblade roller also. I just hold down with my hand, maybe thats not consistent enough.Mike[/QUOTE]

Mike, these are anti-kickback rollers that I got from woodcraft. You can get them HERE. They are spring loaded and apply pressure downward. Make sure you get the green ones, as they allow the wheel to move forward and backwards. The yellow ones only go one direction. This has been a great thread about sharpening. I really like seeing how Colin did that, can't wait to try it out!
Tracy

_________________
Tracy
http://www.luthiersuppliers.com


Top
 Profile  
 
 Post subject:
PostPosted: Thu Oct 05, 2006 3:22 am 
Tracey, do they come 2 in a set for the $35?


Top
  
 
 Post subject:
PostPosted: Thu Oct 05, 2006 3:34 am 
Offline
Koa
Koa
User avatar

Joined: Sat Jan 08, 2005 4:19 am
Posts: 1534
Location: United States
First name: Nelson
Last Name: Palen
Years ago I saw a Delta tool that looked somewhat like a jointer except the cutting tool was similar to a safety planer. The cutting wheel was larger, perhaps 8" in diameter and it's axis was horizontal. It had an infeed table as well as outfeed table like a jointer but both were in the vertical plane. I've not seen one since but would be interested in finding one as it looks like it would solve the problem of tearout when running figured woods thru a jointer.
Would anyone happen to have an info on the Delta tool?
Don't mean to hijack the thread here.
Thanks
Nelson


Top
 Profile  
 
 Post subject:
PostPosted: Thu Oct 05, 2006 5:00 am 
Offline
Brazilian Rosewood
Brazilian Rosewood

Joined: Sat Jan 15, 2005 12:50 pm
Posts: 3933
Location: United States
I can only add a couple of things.

First: aside from keeping it sharp, the setup has to be right. Make sure the edges are lined up with rhe punch marks on the body, and stay that way. When i bought a new one several years ago, neither the pockets nor the cutters were flat, and they tended to shift. Once an edge shifts it's much more likely to leave marks and fling stuff. Lap the cutters if you have to, and scrape the pockets flat on the bottoms.

Once you've used the wheel a few times it will be round...


Top
 Profile  
 
 Post subject:
PostPosted: Thu Oct 05, 2006 10:55 am 
Offline
Cocobolo
Cocobolo

Joined: Tue Jan 03, 2006 4:17 am
Posts: 338
Location: United States
well today, if igured out that I can not get the play out of the radial arm, which is only there when the arm is released so that it can move back and forth. I set it tight against the clockwise stop and adjusted the table perpendicular to the quill using the same method Colin showed above. I also checked the quill and it has no play when it is all the way up, but has noticable play byt he time it is extended only 1/2 inch. So I will have to use the table for my thickness adjustment.

Then I tried to sharpen the cutters but there was too much out of round on the wheel. Removed the wheel fron the arbor and found about .010" play between the arbor and the hole. Wrapped 2 wraps of tape around the arbor and reinstalled the wheel. Better but still out of round. Read Alans note regarding the wheel becoming round so I went for it. After I thought the cutters were sharp I reinstalled and planed a little walnut. Not bad, but some circular tearout. I was able to get rid of it with little scraping. Looked at the cutting edge again and felt it might have too much angle. Should it be straight or slightly angled. Mine was about 15+- degrees. Felt that may be too shallow so I reground the edge to about 5-7 degrees.   
Now I have shavings curling off the cutters and flying all over the room. Even landed in my lemonade.
The surface is smoother and I think the wheel did become rounder.   Also as a result of getting the table set up flat there was almost no lip from one pass to another.
Thanks everybody for all your help... I hope others were able to learn a little from all this too.
I have to build a saf-t-plane booth, got to keep those shavings under control.. I'm thinking a shower curtain enclosure..
Mike


Top
 Profile  
 
 Post subject:
PostPosted: Thu Oct 05, 2006 12:05 pm 
Offline
Koa
Koa

Joined: Thu Apr 07, 2005 2:38 pm
Posts: 632
Location: United States
First name: R
Last Name: Coates
City: Selma
State: CA
Focus: Build
[QUOTE=Terry Stowell] Yep, I'm just buying new ones too. @ ABOUT $24, my time is worth too much not to! Can't wait.
[/QUOTE]

Where can we find these for $24?


Top
 Profile  
 
 Post subject:
PostPosted: Thu Oct 05, 2006 1:19 pm 
Offline
Koa
Koa
User avatar

Joined: Thu Feb 24, 2005 4:53 am
Posts: 1584
Location: PA, United States
Last I checked at Woodcraft ($25 as I recall) A while back. I searched their website and got nothin'...


Top
 Profile  
 
Display posts from previous:  Sort by  
Post new topic Reply to topic  [ 29 posts ]  Go to page 1, 2  Next

All times are UTC - 5 hours


Who is online

Users browsing this forum: No registered users and 12 guests


You cannot post new topics in this forum
You cannot reply to topics in this forum
You cannot edit your posts in this forum
You cannot delete your posts in this forum
You cannot post attachments in this forum

Jump to:  
Powered by phpBB® Forum Software © phpBB Group
phpBB customization services by 2by2host.com